Wednesday, December 15, 2010

Christmas pillows


I made these throw pillows for the Christmas season. I think I got the idea from Martha Stewart, but I couldn't find the article in the magazines or online, so I sort of did it from memory. I think Martha's were stenciled, but I made mine from fabric and ironed them on.

Friday, December 10, 2010

Scarves for St. Anthony's

Dan and I volunteer at St. Anthony's dining room in San Francisco, serving meals. St. Anthony's also has a shelter, a medical clinic, and lots of other services for people in the city. This year they are having a scarf drive - they want to collect 2500 scarves to give away to their clients at Christmas. I thought it would be a good way to revive my knitting skills, and use up some excess yarn I have around the house.

Yesterday I delivered these seven scarves to them! I knit 5 of them myself, and the pink one and the gold one were done by my quilting friend, Carol, who saw me knitting and said "I have a bunch of old yarn, too!", and promptly knit two scarves to add to the pile. And Emily donated some of the yarn for mine when we were in Baltimore and she was cleaning out her craft room. (She says she's abandoning knitting in favor of sewing!)

I'm hoping that St. Anthony's does the same for next year, since I STILL have a pile of yarn sitting here, and I'm getting the hang of this.

Tuesday, November 30, 2010

Baby Things

I've been having such fun making baby things for Emily's baby, and other kids and babies-to-be. These are two "bath buddies" I made from leftover terry cloth (see project #2 below). The pattern was in an issue of Stitch. They have such cute things in there. There are a couple other animal faces to use on these, but since I had blue fabrics, I opted for the bear. I think I'll give one of these to Alex.
These are some hooded towels (and matching washcloth) I made for Emily. I had these two orange prints that I love, but I only had 1/2 yard of each. I started out to make the hooded towel from the pattern on the Purl Bee blog, but that one has the whole towel backed with fabric. I didn't think that made a lot of sense for a baby towel and I didn't have enough fabric for that anyway, so I just got a nice thick, double-sided terry cloth and used the fabric for the hood and the binding.

And this is my version of the baby counting book that Emily made, too - it's also from a pattern in Stitch. I agree with Emily that the pattern for this was really poor. But I just improvised and I love it - I would definitely make it again and just use fusible webbing for all the numbers and shapes.


For the cover, the pattern says to use rubber stamps to stamp the numbers. I couldn't find any stamp ink for fabric, so I used fabric paint. But I didn't trust myself to get it right the first time, so I stamped the numbers on a separate piece of fabric. Then when I had a pretty good set, I sewed that strip to the front and used the rick-rack to cover the seams.

Stay tuned...I'm still working on a quilt and a knit sweater!


Liar!

I like how Diane tries to pretend she's not crafty
http://just-humor-me.blogspot.com/2010/11/homemade-for-holidays.html

Thursday, November 4, 2010

Emily's Redwork

Quite a few years ago, when Emily was learning to sew and embroider, she and I worked together on some redwork embroidery squares.


I think we ordered the patterns from Better Homes and Gardens. Emily was probably around 12, and we completed some blocks then they got tucked away with all our other unfinished projects. Recently I ran across them, washed and ironed them, and cleaned up a few stray threads - they looked great! So I decided to put them together into a quilt for her and/or the baby. They're a bit girly for a baby boy, so I picked a neutral sashing fabric that isn't too childish-looking. I had 16 blocks that were completed and I used those for the quilt top.
There was one extra block that was bit messy - it was probably our practice one! But I used it for the quilt label. I didn't even know what year to put on the label (!) so I just put that it was quilted this year.


And one good thing about Emily being stranded in CA this past week is that I was able to finish it while she was here!

Sunday, October 10, 2010

What I've been working on lately


As pretty much everybody who has ever heard of this blog knows, I'm pregnant and due in January. The picture above is 4 weeks old already from when I was 21 weeks. Everything looks good in there and you can't see it here but the baby has the Laney ball nose! He's one of us! Here's what I looked like at 24 weeks:
Along with this exciting new development, of course, comes a lot of sewing! I've been working on a bunch of projects and will try to photograph them and post in the next few weeks.

Monday, September 6, 2010

Labor Day Weekend Labors

I had a fun Labor Day weekend. First I made a purse/backpack from a pattern from Liesl & Co. (Kathy and Reenie have already made these, and I was so impressed that I ordered the pattern for myself.) You can also order the pattern from Purl Soho in NY with the hardware included. My only advice is to order extra rivets -- I messed up several before I got the general idea.
Next, I re-covered a set of dining room chairs for Robbie and Sarah for their place in Boston. We bought the dining room set from a friend, and the chairs were red velvet. I covered them with some pretty Ralph Lauren fabric that I had on hand..... Reenie and Kathy might recognize it from the vacation in the Outer Banks of North Carolina. We made some tote bags out of it, and I still had enough left over to cover a set of chairs!

Monday, August 16, 2010

Flea Market Find!

There's a new antiques and flea market in San Francisco now at Candlestick Park, and Dan and I went on Sunday. I found this Vera Christmas tablecloth - I remember having Vera tablecloths and towels, and scarves back in the 70's. She was a very popular designer back then, known for her bright and modern floral designs. (There was another tablecloth with her bright yellow poppies design - I could swear I owned a linen towel with that design at one point!) I had heard that her designs are being revived. In fact, in New York I bought some file folders with her designs at the Museum shop. I don't think I had ever seen this Christmas design. The tablecloth is quite large, and my first thought is to cut a hole in it and make it a tree skirt - I need a tree skirt! When I got it home I realized that it's not round though, it's oval. Still could do it, but I don't know...anyone have any other ideas for ways to "re-purpose" this??


Sunday, August 8, 2010

Last wedding post

Okay, one more wedding post before I move on to another set of projects entirely.
When I planned my wedding I tried to ignore the traditions that were expensive or frivolous or that I knew would cause me stress. That sounds rational, right? Until I tell you that two of the things I skipped were wedding favors and bridesmaid gifts. Sorry, dear friends and family who traveled to Baltimore on a holiday weekend, but I didn't feel like wrapping Jordan almonds for you!
That's bad enough, but thinking about my best friends who were helping with the wedding and bought a $165 dress that I chose going home without even a momento of the weekend started to feel very selfish. But what could I get for these amazing women who already have it all?And on my budget of no dollars? Like many of my wedding items, I turned to Etsy and found patterns galore for purses that I figured could make to match the bridesmaid dresses. I bought this pattern http://www.etsy.com/transaction/25755640 and tried it for myself. It wasn't quite right so I added 3 inches to the middle and tried again. It turned out really cute and I made 4 moreassembly-line style.
To make it a little more practical (I did make sure it could hold a small camera and phone, but it's still tiny) I packed a nylon grocery tote from Baggu inside too. This was a Martha Stewart suggestion and it broke my cheapness rule, but I kept 2 for myself and I love them, so I'm pretty sure my bridesmaids and bride's man will love them too.

Monday, July 19, 2010

Denyse Schmidt quilt


I finally finished this queen-size quilt! I wanted a summer quilt for our bed, something light and bright. I love Denyse Schmidt quilt designs, so I decided to make this one from her book "Quilts". She calls it "What a bunch of squares"! I used her color scheme, but added the thin strip of gray around each of the middle squares. And I used all solid colors except for one strip of one of her bright floral prints as a nod to the designer! (You can see it along the bottom of the quilt.)

The blocks are simple and went together well, but I found this huge quilt more than I could handle to machine quilt! I decided to quilt it and assemble it in strips, which I thought would be easier, but it was still really bulky for me to handle on my machine. I quilted it in concentric squares in each block, and despite my best efforts, I ended up with a lot of puckers where the lines of stitching came together. Next time (if!) I will quilt in a continuous design where the lines don't cross to avoid puckers. And in fact if I ever make another quilt this large I think I'll have someone else quilt it on a long-arm machine. I'm just not cut out for it!

All that said, on the bed it's the look I was going for for a summer quilt!

Friday, July 9, 2010

Soft Counting Book


I made this book shortly after Christmas. It came from an issue of Stitch magazine and my mom traced the pattern pieces and scanned the instructions for me. For such a seemingly-simple project it was very hard to follow the instructions. Some of the shapes are supposed to be appliqued with folded-under edges and some are fused and zig-zagged. The pieces are so small that they really should have all been zig-zagged. I found it very hard to turn 1/4 inch under for the 5 hexagons.
Putting the whole thing together was also difficult. The instructions tell you to put the pages together in a different way from the way they are presented in the final product. You make a long piece that has the number 1 and the 5 hexagons on it, then when the book is put together, the hexagons line up with #5. I feel like it would have been better to just make the pages as they are in the final product and bind it some other way. The binding of each page was tough and the edges are all wobbly and uneven.
All that said, I will probably never make this project again let alone try to troubleshoot it's construction.
My friend Hillary likes the book and I'll give it to her so James can learn his numbers with the tiny hexagons. I'm sure he won't be bothered with the fact that some shapes have even edges and some are zig-zagged!

Wednesday, July 7, 2010

Another Wedding Present

It's great having handmade crafters on both sides of my family, and not just for the awesome presents
.
This arrived last week from my uncle Mikel. It is all hand-made. The drawer pieces are all tongue-and-groove and it was hand-finished. It's beautiful. But what is it? It's a replica of an 18th century pipe box. The tobacco goes in the drawer and the tall compartment is for storing a tall ceramic pipe so the pipe doesn't fall over and break. Uncle Mikel specifically discouraged us to take up smoking so we will probably use this for storing keys and any very tall objects that need a new home. Right now it's hanging in our living room and looks great.

Wednesday, June 30, 2010

Baby Quilts close-up


I can't figure out how to do some of the blogger things on my macbook, but maybe this picture will be better.

Tuesday, June 29, 2010

Baby Quilts

I finished the baby quilts for Brian's cousin Erin and her twin boys with a flurry of hand quilting one Friday evening. I was so intent on finishing that I arrived at Zella's Pizzeria with several pieces of thread and quilters tape on my shirt, pants and arms.
I packed them up and mailed them on June 22nd which happened to be the day the babies were born! Brian's aunt Michele brought them to the hospital so the parents could open them. I will post pictures with little John Kayden and Joseph Kellen as soon as I get some. For now, I think they're getting used to being at home and have not had time for proper photoshoots.
Since the boys are twins, I wanted the quilts to look similar but not exactly identical. Brian is an identical twin but he and Doug are very different and I think their mom did a great job nurturing their individuality, so I didn't want these boys to think I think of them as two of the same person! I used 3 inch squares (my new specialty, apparently) and tried to do blue fading to green on one and blue fading to purple on the other. I also included alternating white squares to make it look more classic and organized. The way they are arranged in the picture, the blue portions overlap so it should flow green-blue-purple.
One thing I didn't realize until I bound them and was packing them up is that the blue one is 13x18 squares and the green one is 14x18 squares so it is a few inches wider. Oops! Luckily, John Kayden was born at 5 lbs. 4 oz, while Joseph Kellen is only 4 lbx. 14 oz., so for now I think John Kayden gets the green one.
We're so happy for Erin and her partner Luke and of course grandma Michele! I'm glad these were done in time to help welcome them into the world.

Tuesday, June 22, 2010

Wedding Present


I finally took a picture of the wonderful throw that Kathy gave us for our wedding. It looks great in our living room and we really love it.
The label says "For Emily and Brian, May 2010"

Sunday, June 6, 2010

Wedding Crafts part 4

Everyone who reads this already saw the culmination of all of our efforts on the wedding crafts, but why not post about it anyway?

Big thanks to my bridesmaids who tied napkins, wrote table numbers, and did the flowers both in the hall and the tissue paper ones in the park! And Dan did an amazing job on the corks, ably assisted by my dad who cut the slits in them to hold the placecards. It takes a village, people!

Saturday, May 22, 2010

Wedding Crafts part 3


The table numbers are almost done. I painted the edges with colors corresponding to the place cards last week. Today I painted the faces and soon we just need to add, well, the numbers!

Thursday, May 20, 2010

Wedding Crafts part 2

Ok, cleaning is not the same as crafting, but today I ordered the flowers and finished washing the vases for the table centerpieces.


I have 18 vases and only broke 1 which I think is a pretty good ratio.
These are all from Maya's wedding in October and I'm so lucky to have them and not be scrounging around dollar stores or craigslist right now! In 8 days, we fill them with flowers.

I ordered flowers today from a local flower farm. I got some of everything they had in season including peonies and a bunch of other flowers that I had never heard of. I hope they're pretty!

Wednesday, May 19, 2010

Wedding Crafts part 1

You knew that wedding crafts would appear in earnest at some point, right? The count-down has begun and the crafting has begun as well.


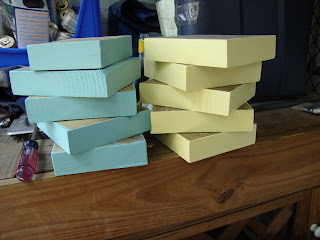
These blocks of wood will be table numbers.


These fabric strips will be napkin ties and may someday be a quilt if my crazy plan in which people round up napkin ties for me at the reception actually happens. Hmmm...some of you may be designated fabric grabbers!

So far these projects have been great fun. More soon!

Sunday, April 25, 2010

Not Cool Enough

I saw a great post on Anna Maria Horner's blog about quilting with embroidery floss. I even commented (which I rarely do) that I would try it on my next quilt. Well, my next quilt is one of the twins quilts for Brian's cousin. I thought that I could use the same color of thread for both quilts to help make them more similar to one another, but it turns out I'm not cool enough for colored thread.

As you can see, I have my usual obsessively-tiny white quilting thread on the left and the chunky purposefully-larger embroidery thread on the right. It turns out that I am not open-minded enough for large visible stitches. I'm back to my little white ones and if anybody can use some navy embroidery thread, let me know. I have more than a few skeins :)

Saturday, April 17, 2010


This is a peg-rack using thread spools as the pegs! It was posted to Facebook by Martha Guidosh, a friend of Pam and me who went to school in Hubbard with us. We think it's really cute! I've seen a similar jewelry rack where the spools were used to hang necklaces and bracelets - I was thinking of making one of those for my dresser with some old spools I picked up at a flea market.

Tuesday, April 6, 2010

more baby quilts

My love affair with 3 inch squares is apparently not over yet. I started another patchwork quilt (2 actually) but on a smaller scale for some baby quilts. Brian's cousin is pregnant with twin boys, so we figured a couple of similar-but-not-identical quilts would be helpful. Here's a picture of early planning steps on my project board:

Wedding Invitations


I haven't done any paper crafting in a long time and it was good to stamp and double-sided-tape and arrange things just so on the wedding invitations. All while watching Hulu, of course.

I don't have any pictures of the wonderful envelope liners, so you'll have to see the real thing when they arrive.

Thursday, March 11, 2010

Baby Quilt update


Just wanted to post a picture of the adorable James on the quilt I made for him. I've been helping his parents by hanging out with James on Thursday afternoons and we play on the quilt a lot. This quilt is probably the coolest thing I've ever made and I love that they use it so much!

Tuesday, March 2, 2010

San Francisco Quiltaway


Every two years, the San Francisco Quilt Guild sponsors "Quiltaway", a 3-day quilting retreat. I went for the first time this year. It's three days of intense sewing and quilting, culminating in "Sew and Tell" of all the projects! Activities are a mix of group projects, working on charity quilts, classes, silent auction and door prizes, and socializing.


I signed up for a 2-day class on making this paper-pieced quilt, a pattern designed by the teacher, Deb Karasik. She is a paper-piece guru who has patterns and techniques for making this type of quilt, with sharp points. This is HER quilt that the class was based on. We brought the fabrics we wanted to use for the quilt, and everyone in the class had a different take on it -


I decided to make it in a southwest-looking color scheme. I didn't get close to finishing the quilt top in the class, despite hours and hours of working on it! Here's what I got done:


I'm not sure the outer blocks really work, and I might re-do them with a slightly different color scheme. You can probably tell that my blocks are not even sewn together yet - I'm waiting to figure out the final arrangement.


Here are some of the other quilts that people made in the class. We had some real over-achievers in there - one woman stayed up til 2 AM one night to get her top put together!


Another thing I did was participate in a Mystery Quilt, which was fun. It involves following directions given one step at a time, not knowing what the final product will look like til it comes together in the end. Here's my quilt:
Otherwise, I made some charity preemie quilts, and I won 4 beautiful skeins of wool yarn in a drawing! We also had to make little 10-inch quilts to exchange as "souvenirs" of the quiltaway - I forgot to take a picture of mine!


Fun weekend - a luxury to be able to sew and quilt and not cook or keep house for the weekend!


Thursday, January 21, 2010

Dan is the man

Check out the prototype placecard holders that Dan created for our wedding:
#1 is a champagne cork with a slit in the top.
#2 is two corks sewn together and the card goes between the corks.
#3 is a single wine cork cut on one side with a slit on top.

The most amazing thing is that Dan burned (!) in the personalization with our names and wedding date. I think they're awesome but would love your opinions. Which should we choose?

Thursday, January 14, 2010

Alex's photo album


These are the pages for a cloth book I made for Alex. It's a pattern developed by a friend of mine who has a little business designing patterns and selling fabric and kits. This is billed as "Baby's first photo album". It incorporates photos printed on fabric into the patchwork pages. I think it's really cute, though mine didn't turn out quite as well as I had hoped. I was disappointed in the quality of the photos printed onto the fabric. I played around with my printer settings and inks and everything, but couldn't get the photos reproduced very well. Anyway, I used the best ones I could get.
We didn't see Kelly, Marc, and Alex over the holidays, but are going down to visit them later this month, so I'll give it to him then.
Posted by Picasa

Monday, January 11, 2010

Printable desk calendar

If, like me, you've been staring at December 2009 for a couple of weeks now, you might like to replace it with this calendar. It's from the same people who posted the 2009 calendar that I used a LOT. Now I have the desk calendar at my computer desk and my amazing village calendar at my student-interaction desk.

Happy New Year!